.svg)
Planning your rollout? See the companion article.
Once enabled, your people sign in with their existing work credentials and your IT team controls CheckWorkRights access from the same place it controls everything else.
You can configure and test SSO without switching it on, so nothing changes for your users until you choose to enable it.
Who needs to be involved
- Your Team’s CheckWorkRights Administrator, who needs access to Admin > Integrations.
- Someone who administers your identity provider, usually IT.
Send your IT team or whoever manages your identity provider this setup guide before you start.
Before you start
Three things account for most problems:
- Email addresses must match. A user's CheckWorkRights email must be identical to their primary email or UPN in your identity provider.
- CheckWorkRights permissions still apply. SSO controls whether someone can authenticate, not what they can do. A user might authenticate fine with SSO but lack access as a result of the CWR account config. See User Security.
- There is no automated provisioning. CheckWorkRights does not support SCIM or just-in-time provisioning. Adding someone to the CheckWorkRights application in your identity provider does not create a CheckWorkRights account for them.
Managed where Who can authenticate Your identity provider Password policy and MFA Your identity provider Creating and deactivating users CheckWorkRights, manually Access profiles and permissions CheckWorkRights, manually
The process
- IT configures the application in your identity provider.
- You enter the details in CheckWorkRights and save. Nothing changes for your users yet.
- You test the connection.
- You enable SSO. This is when it goes live for all users on your account.
Steps 2 and 3 repeat as often as you need, and you can back out entirely at any point.
SSO status
The SSO panel shows a status label and the actions available in that state. The same label appears on the SSO tile on the Integrations page.
| Status | Meaning | Available actions |
|---|---|---|
| Disabled | Not configured, or configured but not enabled. Users sign in with their CheckWorkRights password. | Enable, to begin configuration |
| Pending Connection Test | Configuration saved, not yet tested. No change for users. | Test Connection, Discard Configuration |
| Connection Test Successful | Configuration works. SSO still off for all users. | Enable, Discard Configuration |
| Okta Enabled, Microsoft Entra Enabled or Custom SAML Enabled | SSO live. All users authenticate through your identity provider. | Disable |
Step 1: IT configures your identity provider
IT creates an application on their side and returns the details you enter in step 2. What comes back depends on the provider:
- Microsoft Entra: Client Id, Client Secret, Tenant Id.
- Okta or Custom SAML: Issuer, Single Sign-On URL and X.509 signing certificate, either as metadata XML, a metadata URL, or individual values.
IT also needs values from CheckWorkRights to complete their side. Those are listed under each provider below, and for SAML one of them is the Audience Restriction from your SSO settings, so it can help to open that screen first.
Step 2: Configure SSO in CheckWorkRights
Go to Admin > Integrations, find the SSO panel and click Enable. The Add your Credentials dialog opens. Required fields are marked with an asterisk.
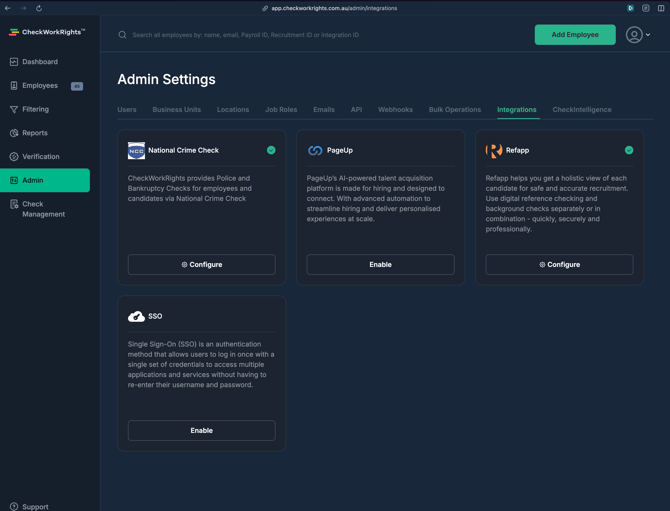
Choose your SSO Provider: Microsoft Entra, Okta or Custom SAML. The form changes to suit.
Microsoft Entra
Enter the three values from your Entra app registration:
- Client Id
- Client Secret
- Tenant Id
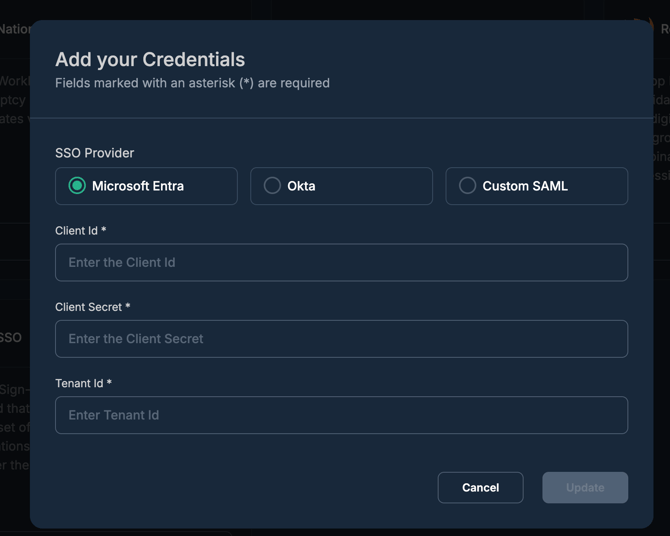
Okta or Custom SAML
Both use SAML and need the same information.
Copy the Audience Restriction value with the Copy button and give it to IT. It is unique to your account.
Then supply your identity provider's details one of three ways. All produce the same result:
- Upload XML File
- Metadata URL
- Manual Entry, which is three fields:
- Issuer, the Entity ID URL
- Single Sign-On URL, where CheckWorkRights sends users to authenticate
- Signing Certificate (X.509), pasted in full
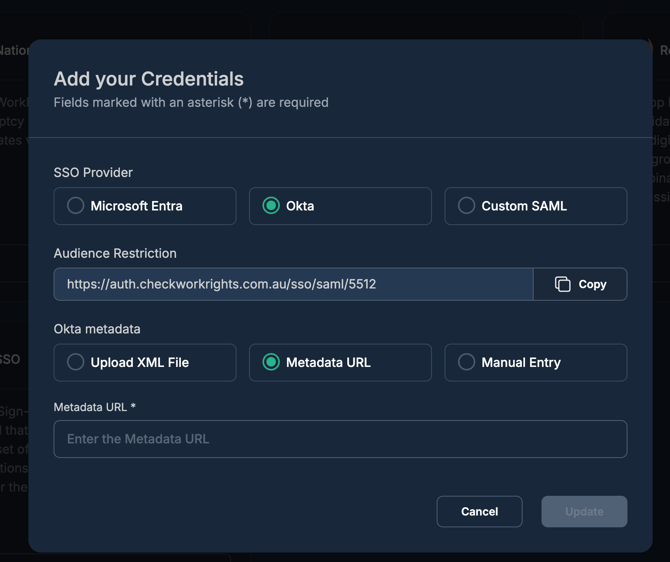
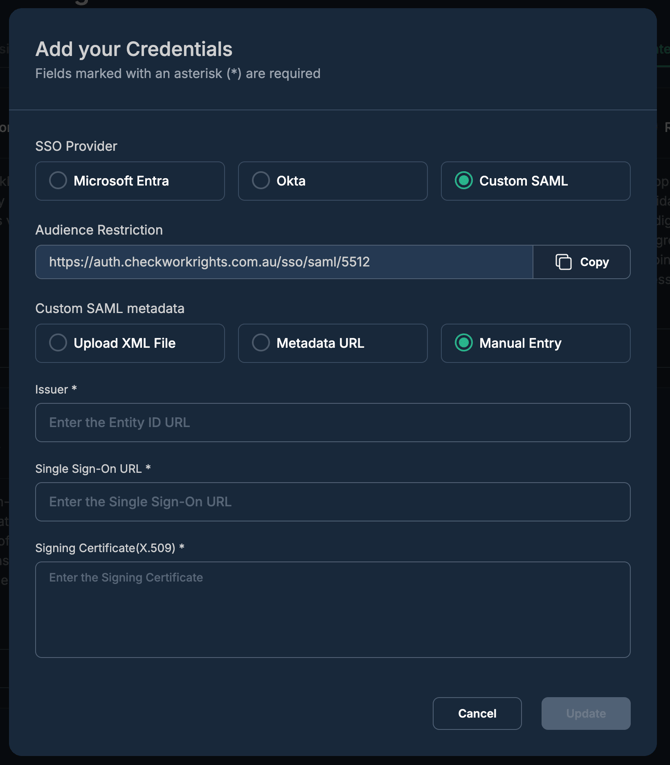
XML and URL entry simply populate those same three fields, so you can review what was imported before saving. To refresh them later, use Update Metadata from XML or URL.
Save
Click Update. Saving does not switch SSO on and does not require a test. Your users are unaffected, and a saved untested configuration can sit indefinitely.
Optional: signed requests
Okta and Custom SAML can turn on Enable signed requests, which makes CheckWorkRights sign its authentication requests using SHA-512 so your identity provider can verify they came from us. Off by default. Not available for Entra, which uses OpenID Connect.
|
|
 ⚠️Confirm your identity provider supports signed requests. Enabling this against a provider that does not support it will stop logins working. If nobody is certain, leave it off.
 To use it:
- Turn on Enable signed requests. A certificate and private key are generated for your account; the private key stays with CheckWorkRights.
- Click Download certificate and send it to IT.
- IT uploads the certificate to your application and switches on signed request verification. Both are required.
- Save, then test.
Wait for IT to confirm their side before testing. If SSO is already live, changing this setting switches it off until you re-test and re-enable.
Step 3: Test the connection
The panel now shows Pending Connection Test. Click Test Connection. You are redirected to your identity provider to authenticate.
The account you use must have an email address matching your CheckWorkRights account. A personal or secondary account will fail even when the configuration is correct.
On success you return to CheckWorkRights, the status moves to Connection Test Successful, and Enable becomes available.
On failure you can fix and retry. Check:
- The details match what your identity provider issued. Re-importing the metadata is faster than checking by eye.
- The Audience Restriction is set correctly on your identity provider.
- If using signed requests, IT has both uploaded the certificate and enabled verification.
- The account you tested with is assigned to the application in your identity provider.
- Your CheckWorkRights email matches your UPN exactly.
A failed test does not affect your users.
Discard Configuration Option
Discard Configuration clears the saved configuration, which is useful if you selected the wrong provider. It is available at any point before SSO is enabled, you would need IT's details again to start afresh.
Step 4: Enable SSO
Click Enable. From that point, all users authenticate through your identity provider, existing CheckWorkRights passwords stop working, and there is no per-user opt-out.
Before you do, work through the SSO go-live plan.
Changing your configuration later
Saving a change switches SSO off. Your users return to password login until you run Test Connection and click Enable again. A configuration is never live unless it has passed a test in its current form, so a bad edit cannot lock you out. It does mean edits are a planned change rather than a quick fix:
- Complete all three steps in one sitting rather than saving and walking away.
- Users who have never had a CheckWorkRights password will need to create one via the forgot password link during the gap.
Changes on your identity provider side that do not affect the values held in CheckWorkRights need no change here, and SSO stays live.
Disabling SSO
Go to Admin > Integrations, click Disable and confirm.
Users return to password login with all standard options available. Anyone who joined while SSO was enabled and never had a password creates one via the forgot password link.
Disabling also clears your saved configuration, so switching SSO back on later means entering your provider details again. To adjust a setting, edit the configuration instead.
Connecting your identity provider
The steps above apply to all three options. These sections cover the differences.
Microsoft Entra
Entra connects over OpenID Connect, so there is no metadata file or Audience Restriction to exchange. It is our recommended option for Microsoft customers.
What IT configures. In outline, a non-gallery enterprise application with:
| Setting | Value |
|---|---|
| Redirect URI (Web) | https://auth.checkworkrights.com.au/sso/entra/callback |
| Redirect URI (Mobile and desktop) | checkworkrights://oauth/ |
| Delegated Microsoft Graph permissions | email, offline_access, openid, profile, User.Read, with admin consent granted |
IT also assigns the users or groups who need access, and turns off app visibility for users. Sign-in must start from CheckWorkRights, so an app tile in the Microsoft launcher would not work.
The mobile redirect URI is what makes SSO work in the CheckWorkRights mobile app. Omit it and web sign-in works while mobile does not.
Worth knowing
- Match on UPN, not email address. This is the most common cause of a user being unable to sign in. If Jack Smith's UPN is
jsmith@company.combut his email isjack.smith@company.com, his CheckWorkRights account must bejsmith@company.com. Check anyone whose UPN and email differ before enabling. - Client Secrets expire. SSO stops working when the secret lapses. Have IT record the expiry and issue a new secret in advance, then update it in CheckWorkRights and re-test.
- The Microsoft account picker. Users signed in to several Microsoft accounts pick one, and picking the wrong one signs them in as that account or refuses them. Worth mentioning in your comms.
- Consent prompt. Depending on tenant settings, users may see a one-off permissions prompt.
If you need SAML instead
Some organisations require SAML rather than OpenID Connect. Entra supports SAML, so connect it through our ‘Custom SAML’ option instead. We recommend the standard Entra option where you have the choice, since it has fewer moving parts and no certificate to track.
Okta
Okta connects over SAML. The process is identical to any other SAML provider.
What IT configures. A SAML 2.0 application with:
| Okta field | Value |
|---|---|
| Single sign-on URL | https://auth.checkworkrights.com.au/sso/saml/callback |
| Audience URI (SP Entity ID) | Your Audience Restriction value |
| Name ID format | EmailAddress |
IT also assigns the relevant users or groups under Assignments.
What IT returns. Issuer (Okta calls it Identity Provider Issuer), Single Sign-On URL, and the X.509 signing certificate from the active SHA-2 entry in SAML Signing Certificates. Okta can also supply all three via View IdP metadata, whose browser tab URL is what you paste into Metadata URL.
Worth knowing
- Assignment is separate from configuration. Creating the application grants nobody access. An unassigned user cannot sign in even when CheckWorkRights is correct.
- Leave Provisioning set to None. Okta offers SCIM on the application's General tab. CheckWorkRights does not support it, so enabling it will not create or sync users.
- Recipient and Destination URLs match the sign-on URL. Okta's create flow handles this with a checkbox. Worth checking if sign-in fails.
- Hide the app icon from users. Sign-in has to start from CheckWorkRights, so clicking a CheckWorkRights tile in the Okta dashboard will not sign anyone in. Set Do not display application icon to users to avoid the confusion.
Custom SAML
Any identity provider supporting SAML 2.0 works, including Google Workspace, OneLogin, Ping and JumpCloud. This is also how you connect Entra over SAML.
What IT configures:
| Setting | Value |
|---|---|
| Audience / Entity ID | Your Audience Restriction value, unique to your account. Looks like https://auth.checkworkrights.com.au/sso/saml/[account id]. Copy it from the CWR dialog. |
| Single Sign-On URL / ACS / reply URL | https://auth.checkworkrights.com.au/sso/saml/callback |
| Recipient URL | https://auth.checkworkrights.com.au/sso/saml/callback |
| Destination URL | https://auth.checkworkrights.com.au/sso/saml/callback |
| Name ID format | EmailAddress |
The callback URL is the same for every CheckWorkRights customer; only the audience value is account-specific. Some providers ask for recipient and destination separately, others assume they match the sign-on URL. Leave any Default RelayState field empty.
No additional SAML attributes are required. CheckWorkRights identifies users by the email address in the Name ID, so if your identity provider sends a username or employee ID instead, sign-in fails.
Sign-in must be initiated from CheckWorkRights. Identity provider initiated sign-in is not supported, so users cannot launch CheckWorkRights from an app tile or dashboard in your identity provider. It is worth hiding the application icon from users for that reason.
What IT returns:
| We need | Also called |
|---|---|
| Issuer | Entity ID, IdP Issuer, Identity Provider Issuer |
| Single Sign-On URL | SSO URL, Login URL, IdP endpoint, SAML 2.0 endpoint |
| Signing Certificate (X.509) | Signing certificate, IdP certificate, public certificate |
Note that "Single Sign-On URL" appears on both sides and means different things. On your identity provider it is the endpoint CheckWorkRights sends users to. In CheckWorkRights it is the value you paste in.
Worth knowing
- Metadata URL is worth preferring where your provider publishes one, since it saves transcription errors. Not all providers offer it.
- Signing certificates expire and SSO stops working when one lapses. Have IT note the expiry and rotate in advance, then update CheckWorkRights and re-test.
Frequently asked questions
Do all users have to use SSO?
Yes. Once SSO is enabled, everyone on your account authenticates through your identity provider. There is no option to leave some users on password login.
Can we set SSO up without turning it on?
Yes. Configure it, save it, and test it as often as you need. Nothing changes for your users until you click Enable.
Is there a break glass or emergency access account?
No separate break glass account is provided. We recommend confirming at least two Administrator accounts can authenticate before you enable SSO. If your organisation does lose access entirely, contact the CheckWorkRights team and we can recover it.
If we turn SSO off, can everyone still get in?
Yes. Users go back to signing in with their CheckWorkRights password, with all the usual login options available. Anyone who joined while SSO was enabled and has never had a password creates one from the login page using the forgot password link.
Disabling also clears your saved configuration, so switching SSO back on later means entering your provider details again. If you only need to adjust a setting, edit the configuration instead.
We need to change our SSO configuration. Will that affect our users?
Yes, briefly. Saving a change switches SSO off, so your users return to password login until you run Test Connection and click Enable again. Plan the change for a window where you can complete all three steps in one sitting.
Will users see a different login page?
No. Everyone starts at the usual CheckWorkRights login page and enters their email address. If that email belongs to an organisation with SSO enabled, they are redirected to the identity provider to authenticate.
Which identity providers are supported?
Microsoft Entra, Okta, and any identity provider that supports SAML 2.0.
We use Microsoft, but our security policy requires SAML. Can we still connect?
Yes. Use the Custom SAML option and configure Entra as a SAML identity provider. We recommend the standard Entra option where you have the choice, since it involves fewer moving parts, but SAML is fully supported.
Do you support SCIM or automated user provisioning?
No. CheckWorkRights does not support SCIM, SAML just-in-time provisioning, or any other form of automated user creation or synchronisation. User accounts must be created in CheckWorkRights, and their access profiles set, before those users can sign in. The same applies to updating and deactivating them.
If we add someone to the CheckWorkRights app in our identity provider, can they log in?
Not on its own. They also need a CheckWorkRights account with a matching email address and an access profile assigned. Without it they will authenticate successfully at your identity provider and then be refused at CheckWorkRights.
When someone leaves, is removing them from our identity provider enough?
It stops them authenticating, which is the important part. But their CheckWorkRights account remains, so you should still deactivate them in CheckWorkRights as part of your offboarding process.
Does enabling SSO change user permissions?
No. SSO governs authentication only. What a user can see and do in CheckWorkRights is still controlled by their access profile. See User Security.
Can users open CheckWorkRights from our identity provider dashboard?
No. Identity provider initiated sign-in is not supported, so a CheckWorkRights tile in your Okta dashboard or Microsoft app launcher will not sign anyone in. Users always start at the CheckWorkRights login page. For that reason we recommend hiding the CheckWorkRights application icon from users in your identity provider, and pointing people at the CheckWorkRights URL instead.
Does SSO work on the CheckWorkRights mobile app?
Yes. Once SSO is enabled, signing in on the mobile app works the same way it does on the web: enter your work email and you are redirected to your identity provider to authenticate.
Setting SSO up is web only. Configuring the integration, testing the connection and enabling or disabling SSO all have to be done by an Administrator in the web app.
Troubleshooting
A user cannot sign in with their work credentials.
Work through these in order:
- Confirm their CheckWorkRights email matches their identity provider primary email (UPN) exactly. A CheckWorkRights Administrator can check this.
- Ask your identity provider administrator to confirm the user is assigned to the CheckWorkRights application.
- If they reach an access denied screen after authenticating, authentication worked and the problem is CheckWorkRights permissions. An Administrator should review their access profile.
A user enters one email at CheckWorkRights and a different one at the identity provider.
The identity provider wins. Whoever they authenticate as at the identity provider is who they are signed in as, provided a matching CheckWorkRights user exists.
A user signs in at the identity provider but ends up back at the login page with an error.
This usually means the email address they authenticated with does not correspond to a CheckWorkRights user on your account. Have them start again with the correct work email address, and check that the address matches their CheckWorkRights account exactly.
Everyone was fine, then logins stopped working.
The most common cause is an expired credential on your identity provider side. Entra client secrets and SAML signing certificates both expire. Ask your IT team to check, and if they issue a new one, update it in CheckWorkRights and run Test Connection again.
We enabled SSO and administrators cannot get in.
Contact the CheckWorkRights team. We can recover access to your account.